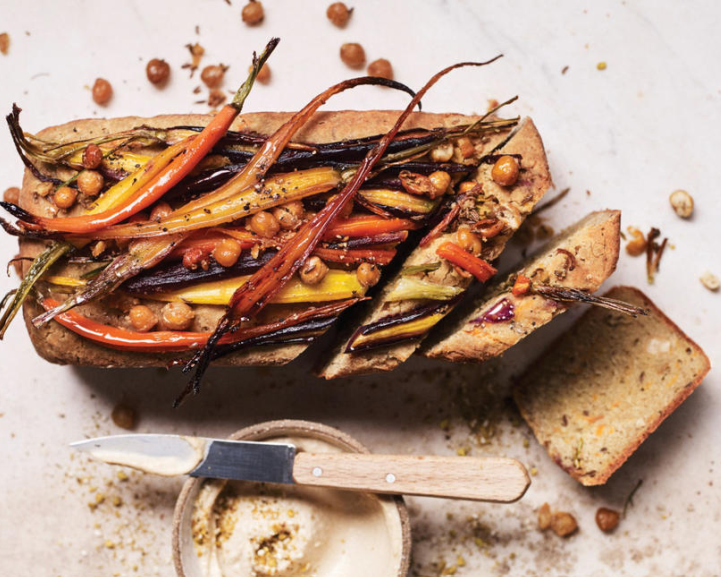
Calling all bread enthusiasts and flavor adventurers! Are you ready to embark on a baking journey that bursts with vibrant colors, delightful textures, and a symphony of savory spices? Buckle up, because we’re diving headfirst into the world of Chickpea, Carrot & Caraway Bread!
This isn’t your average loaf; it’s a rustic masterpiece waiting to be devoured. We’re talking about a bread that’s not only beautiful to behold but also packed with protein, fiber, and a unique caraway seed twist. It’s the perfect addition to your breakfast table, a delightful lunch companion, or a satisfying snack whenever the craving hits.

So, what makes this Chickpea, Carrot & Caraway Bread so special?
- A Rainbow of Roasted Goodness: We’re talking about a delightful combination of baby carrots, bursting with color and sweetness, that are roasted to perfection. Imagine them as tiny flavor bombs ready to add a touch of sunshine to your bread.
- The Power of Chickpea Flour: This magical ingredient adds a delightful nutty flavor and a boost of protein, making this bread a true nutritional powerhouse. It’s like giving your bread a superhero makeover!
- The Caraway Seed Symphony: These little spice soldiers add a touch of warmth and earthy complexity to the party. Think of them as the flavor conductors, leading the orchestra of deliciousness.
- Gluten-Free Freedom: This recipe uses a combination of buckwheat flour and chickpea flour, making it a delicious option for those with gluten sensitivities. Everyone gets to join the bread-loving party!
Now that you’re intrigued, let’s get baking!
Act 1: Setting the Stage (Preparation):
- Preheat your oven to 350°F (175°C). Let it preheat thoroughly, like warming up the stage for the star of the show – our Chickpea, Carrot & Caraway Bread!
- Line an oven tray with parchment paper. Think of it as a red carpet for your beautiful roasted baby carrots to make their grand entrance.
- Grease a 4-inch deep, 4½-inch x 9-inch loaf pan. Don’t forget to line the base and sides with parchment paper as well. Imagine it as a cozy little apartment for your bread dough to rise and shine.
- Gather your baby carrot crew! Trim them, leaving a little bit of the stalk attached for visual appeal. Then, halve them lengthwise, like tiny flavor boats ready to be filled with deliciousness.
- Place the halved baby carrots on your lined oven tray. Drizzle them with a touch of olive oil for a golden glow, and season them with your favorite spices. Think of it as giving them a pre-show pep talk to ensure a flavorful performance.
Act 2: Roasting the Stars (Baby Carrot Roasting):
- Send your baby carrots on a roasting adventure! Pop them into the preheated oven for 30 minutes. Imagine them basking in the heat, transforming into beautifully caramelized flavor bombs.
- While the carrots are busy becoming superstars, let’s move on to the next step. Coarsely grate your large carrot – you need about 1 cup. Think of it as adding a touch of sunshine and sweetness to the bread dough.
Act 3: The Dough Symphony (Mixing & Rising):
- In a large bowl, combine the grated carrot with ½ cup of chickpeas. This is where the magic starts, as different textures and flavors come together in a beautiful harmony.
- Now, add the dry ingredients to the party! We’re talking about 1½ cups buckwheat flour (with an extra 2 tablespoons for dusting), 1½ cups chickpea flour, psyllium husks (a secret weapon for texture!), yeast, caraway seeds, and a sprinkle of sea salt flakes.
- In a separate bowl, combine 1¼ cups of water and the extra olive oil. This will be the liquid magic that brings all the dry ingredients together into a cohesive dough.
- With your trusty electric mixer on low speed (or using a good old-fashioned wooden spoon), slowly add the wet ingredients to the dry ingredients. Mix until a well-combined dough forms, like a beautiful melody coming together.
- Lightly dust a clean work surface with some of your extra buckwheat flour. Flour your hands as well, like putting on baking gloves for this next step.
- Transfer the dough from the bowl to your floured work surface. Using your hands, gently shape the dough into a beautiful 9-inch log. Think of it
Act 3: The Dough Symphony (Mixing & Rising) Continued:
- Transfer the dough from the bowl to your floured work surface. Using your hands, gently shape the dough into a beautiful 9-inch log. Think of it as creating a flavorful masterpiece ready to rise and shine.
- Carefully place the dough log into your prepared loaf pan. Cover it with a clean kitchen towel, like a cozy blanket for a good night’s sleep. Let it rise for 1 hour, or until it increases in size by about a quarter. Imagine it taking a deep breath and puffing up with pride, ready to bake.
Act 4: The Grand Finale (Baking & Cooling):
- While your dough is patiently rising, take a peek at the baby carrots. After their 30-minute roasting adventure, they should be beautifully caramelized and softened slightly. Take them out of the oven and let them cool a bit – you don’t want any burnt fingers!
- When the dough has finished its rise, it’s time for the grand finale! Preheat your oven to 350°F (175°C) again, just in case it dropped a bit while the dough was rising.
- Now comes the fun part: decorating! Arrange the cooled baby carrots lengthwise on top of the risen dough in the loaf pan. Imagine them as colorful tiles creating a beautiful mosaic on your bread masterpiece.
- Don’t forget the supporting cast! Scatter the remaining chickpeas and caraway seeds over the top of the carrots. Think of it as adding the finishing touches to your flavor symphony.
- Pop your beautifully decorated loaf pan into the preheated oven. Bake for 50 minutes, or until the bread is golden brown and sounds hollow when you tap it. Imagine the aroma filling your kitchen – a symphony of baking goodness!
- Once the baking time is complete, resist the urge to dig in right away! Let the bread cool completely in the pan for a bit. This allows the flavors to settle and the texture to firm up perfectly.
Tips for a Flavorful Finale:
- Storage Secrets: This bread will keep in an airtight container in the fridge for up to 1 week. It can also be frozen for up to 1 month, like putting your bread masterpiece on pause until you’re ready for another delicious adventure.
- The Power of Leftovers: Don’t fret if you have leftover bread! Toast slices for a delightful breakfast or snack, or use them for sandwiches with your favorite fillings.
This Chickpea, Carrot & Caraway Bread recipe is more than just a culinary creation; it’s an experience. It’s a chance to unleash your inner baker, experiment with flavors, and create a beautiful and delicious masterpiece for yourself and your loved ones. So grab your ingredients, preheat your oven, and get ready to embark on this delightful baking adventure!
Remember, baking is a journey, not a destination. Enjoy the process, embrace the creativity, and savor the delicious results. Happy Baking!