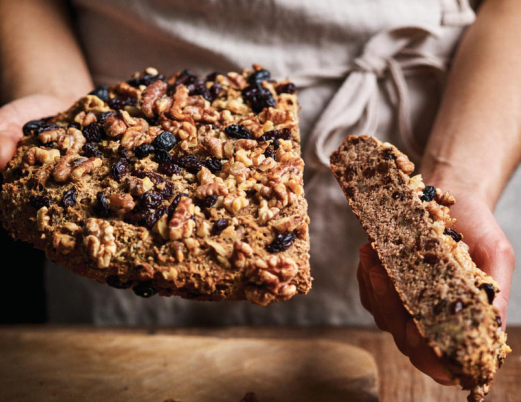
This bread may sound unusual, but the tea adds a subtle malty depth that complements the sweetness of the raisins and the nutty crunch of the walnuts. Here’s a breakdown of the recipe to get you started:
Stage 1: Soaking the Raisins and Starting the Yeast (15 minutes)

- Brew the Tea: Place the tea bags in a heatproof bowl and pour the boiling water over them. Let them steep for 5 minutes to infuse the flavor.
- Sweeten & Activate the Yeast: While the tea steeps, add the raisins and raw sugar to the bowl. Once the tea is lukewarm (not too hot!), remove the tea bags and discard them. Add ½ cup of the lukewarm tea liquid, sugar, and yeast to a separate small bowl. Give it a good stir to dissolve the yeast and sugar.
- Let the Yeast Get Frothy: Set the yeast mixture aside in a warm place for about 5 minutes. You’ll know it’s ready when it becomes frothy and bubbly, indicating the yeast is activated.
Stage 2: Mixing the Dough (10 minutes)
- Prep the Bowl: While the yeast activates, lightly grease your 8-inch domed mixing bowl. Psyllium husks tend to create a wet dough, so the dome shape helps it hold its form during rising.
- Whisk & Sift: In your large bowl, whisk together the remaining lukewarm tea (minus the soaked raisins) with the psyllium husks. In a separate bowl, sift together the buckwheat flour, quinoa flour, tapioca flour, baking powder, pumpkin pie spice, and salt.
- Combine Wet & Dry Ingredients: Once the yeast is frothy, pour it along with the melted coconut oil into the large bowl with the psyllium husk mixture. Add the dry ingredients from the other bowl and stir everything together until a wet dough forms.
- Incorporate Raisins & Walnuts: Finally, fold in 1 cup of the soaked raisins and ½ cup of the chopped walnuts.
Stage 3: Rising, Baking, & Enjoying (1 hour 15 minutes + baking time)
- Dough Rise: Transfer the soft dough to your greased domed bowl. Cover it with plastic wrap and let it rise in a warm spot for 1 ½ hours. The dough should double in size during this time.
- Preheat & Prepare: While the dough rises, preheat your oven to 350°F (175°C). Line a baking tray with parchment paper for easy transfer after baking.
- Second Rise & Bake: Once the dough has doubled in size, gently tip it out onto your prepared baking tray. Scatter the remaining raisins and walnuts over the top of the dough for an extra touch of beauty and flavor. Bake the bread for 65 minutes, or until golden brown and sounds hollow when tapped. If the top starts to brown too quickly, loosely tent it with foil during the last half of baking.
(Remember, this is a wet dough and may spread out during baking.) - Cool & Slice: Let the baked bread cool completely on a wire rack before slicing and enjoying.
Tips for Success:
- Use warm, not hot, tea to avoid killing the yeast.
- Psyllium husks absorb liquid, so don’t worry if the dough seems wetter than usual.
- This bread is best enjoyed fresh, but you can store leftovers in an airtight container at room temperature for up to 3 days or freeze it for up to 1 month.
This Tea-Soaked Raisin Walnut Bread recipe goes beyond just offering delicious instructions. It’s an invitation to explore the unique world of gluten-free baking and discover the potential for flavor and texture within dietary restrictions.
Here are some reasons why you might choose to bake gluten-free bread:
- Gluten Sensitivity or Celiac Disease: For those with gluten sensitivity or celiac disease, gluten-free baking opens a door to enjoying delicious bread without the associated health concerns.
- Dietary Exploration: Perhaps you’re curious about exploring alternative flours and dietary variations. This recipe is a fantastic starting point to experiment with gluten-free baking.
- A Celebration of Variety: Even if you don’t have specific dietary restrictions, gluten-free baking offers a delightful way to expand your baking repertoire and enjoy the unique textures and flavors of alternative flours.
This recipe utilizes a combination of buckwheat flour, quinoa flour, and tapioca flour to create a delicious gluten-free loaf. Each flour brings its own unique characteristics:
- Buckwheat Flour: A nutty-flavored flour that adds a pleasant texture to gluten-free baked goods.
- Quinoa Flour: High in protein and adds a slightly earthy flavor to the bread.
- Tapioca Flour: Provides a binding element and helps create a slightly chewy texture.
With a little practice and this recipe as your guide, you can unlock the world of gluten-free baking and enjoy delicious and satisfying breads like this Tea-Soaked Raisin Walnut Bread.
So, preheat your oven, grab your gluten-free flours, and embark on a delicious baking adventure!
Tea-Soaked Raisin Walnut Bread: Variations on a Delicious Theme
The beauty of this Tea-Soaked Raisin Walnut Bread lies in its versatility. Feel free to personalize it to suit your taste preferences and dietary needs. Here are some inspirational ideas to get your creative baking juices flowing:
- Swap the Raisins: Don’t love raisins? Substitute them with dried cranberries, chopped dried cherries, or even chopped apricots for a delightful twist on the flavor profile.
- Nutty Variations: While walnuts are a classic choice, explore other nuts like pecans, almonds, or even a chopped nut mix for added textural interest.
- Spice it Up: For a touch of warmth, add a pinch of ground ginger, cloves, or nutmeg to the dry ingredients before mixing them into the dough.
- Chocolate Craving: Craving a more decadent option? Fold in ½ cup of chopped dark chocolate chips during the final stages of incorporating the raisins and walnuts.
- Sweetener Options: While the recipe uses raw sugar, feel free to experiment with other natural sweeteners like honey, maple syrup, or even a touch of molasses.
Remember, these are just a few ideas to spark your creativity! Don’t be afraid to experiment with different flavor combinations and add-ins to create your own unique take on this delicious Tea-Soaked Raisin Walnut Bread.
FAQs for Baking Success
Here are some frequently asked questions to address any lingering doubts you might have about this Tea-Soaked Raisin Walnut Bread recipe:
- Can I use a different type of gluten-free flour blend? Absolutely! While this recipe uses a specific combination of flours, you can substitute it with a pre-made gluten-free flour blend. Just ensure the blend incorporates a binding agent like xanthan gum or psyllium husk powder.
- What if my dough seems too wet? Psyllium husks absorb liquid, so the dough will naturally be wetter than traditional bread dough. Resist the urge to add extra flour, as this can make the final loaf dense.
- The bread isn’t rising properly, what could be wrong? There are a few possibilities: Ensure your yeast is fresh and active. Double-check the water temperature – it shouldn’t be too hot, as this can kill the yeast. Finally, make sure your dough has a warm spot to rise – a sunny windowsill or near a preheated oven (turned off) can be ideal.
- How can I store leftover bread? This bread is best enjoyed fresh, but leftovers can be stored in an airtight container at room temperature for up to 3 days. For longer storage, wrap the cooled bread tightly in plastic wrap or place it in a freezer-safe container for up to 1 month.
- How do I reheat leftover bread? To reheat leftover slices, preheat your oven to 350°F (175°C). Wrap individual slices in foil and warm them for about 10 minutes, or until heated through. You can also toast slices for a warm and crispy texture.
With these FAQs in mind, you’re well on your way to baking a delicious and satisfying Tea-Soaked Raisin Walnut Bread. So, grab your ingredients, unleash your inner baker, and enjoy the process of creating a delightful gluten-free treat!