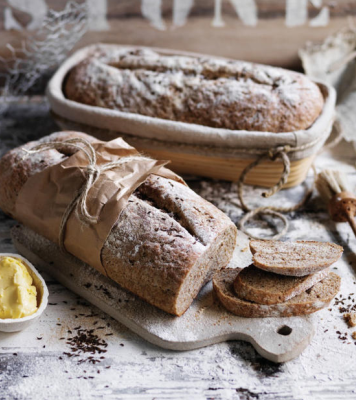
Hey there, fellow bread baking enthusiasts! Today, we’re diving headfirst into the delicious world of rye bread.
This hearty and flavorful loaf is a staple in many cultures, and for good reason. From its dense, satisfying texture to its complex, slightly tangy flavor, rye bread is a versatile bread that can be enjoyed in countless ways.
Whether you’re a seasoned baker or a curious home cook just starting out, this recipe is for you. We’ll be crafting a classic rye bread using a blend of rye flour and all-purpose flour, with the help of trusty active dry yeast.
This means no waiting around for a sourdough starter to mature – perfect for those times when a fresh loaf beckons but patience is wearing thin.
So, grab your mixing bowl and get ready to bake up a storm!
A Slice of Rye Bread Perfection: Nutritional Powerhouse

Rye bread isn’t just about the taste (although, let’s be honest, that’s pretty darn amazing too!).
It’s also a nutritional powerhouse. Compared to its white bread counterpart, rye boasts a higher fiber content, keeping you feeling fuller for longer. It’s also a good source of B vitamins and essential minerals like magnesium and iron.
Let’s Bake Some Rye Bread!
This recipe yields three beautiful loaves, perfect for sharing with friends and family (or keeping all to yourself, we won’t judge!).
Prep Time: 10 minutes Cook Time: 40 minutes Total Time: 1 hour 15 minutes + standing Servings: Makes 3 loaves
Ingredients:
- 4 teaspoons (14g) dried yeast
- 1 tablespoon brown sugar
- 4 ¾ cups (675g) all-purpose flour, plus 2 tablespoons extra
- 3 cups lukewarm water
- 4 cups (500g) rye flour
- 3 teaspoons table salt
- 1 ½ tablespoons caraway seeds
- 2 tablespoons olive oil
Optional – Sourdough Starter:
- 2 teaspoons (7g) dried yeast
- 1 teaspoon granulated sugar
- 1 ¼ cups lukewarm water
- 1 ½ cups (225g) plain all-purpose flour
Instructions:
- Make the Sourdough Starter (Optional): If you’re feeling adventurous and have a little extra time, you can make your own sourdough starter. This adds a deeper tang to your rye bread. However, feel free to skip this step and use the active dry yeast for a quicker option.
- In a large bowl, combine the yeast, sugar, and water. Cover the bowl and let it stand for 10 minutes, or until the mixture becomes bubbly.
- Sift the flour into the bowl with the yeast mixture and stir until just combined. Cover the bowl and let it stand at room temperature for 2 days before using. After 2 days, your starter should have a pleasant, mildly sour smell and small bubbles on the surface – a sign that it’s active!
- Combine the Dry Ingredients: In a large bowl, whisk together the flours, salt, and caraway seeds (if using).
- Activate the Yeast: In a separate bowl, warm up your water – think bath temperature, not scalding hot. Stir in the brown sugar and 1 tablespoon of the olive oil. Watch the magic happen as the yeast mixture gets nice and foamy – that’s how you know it’s alive and ready to work its wonders!
- Bringing it All Together: Now comes the fun part – combining the wet and dry ingredients! Pour the bubbly yeast mixture into the dry ingredients and, using a wooden spoon, mix it all together until a shaggy dough forms. Don’t worry if it looks a little rough around the edges – that’s perfectly normal for rye dough.
- Knead to Know: Gently transfer the dough to a lightly floured surface. Here comes the kneading – the process that develops the gluten in the dough, giving it that beautiful structure. Add the remaining tablespoon of olive oil and knead for about 8 minutes. Unlike all-purpose flour dough, rye dough is naturally a bit sticky, so don’t be surprised if it feels a little different. The key is to knead until the dough becomes smooth and elastic, not dry and stiff.
- Let the Rise Begin! Find yourself a nice, cozy spot for your dough to relax and rise. Grease a large bowl and plop your beautiful dough creation inside. Cover it with plastic wrap and let it rise in a warm place for about an hour, or until it doubles in size. Think of it as the dough’s time to take a deep breath and get ready for the oven!
- Shaping Up: After a glorious hour of rising, your dough should be looking nice and puffy. Give it a gentle punch to deflate it a bit, then transfer it to a lightly floured surface. Here’s where you get to unleash your inner baker and shape your masterpiece! You can go for a classic round loaf, a long oval loaf, or even get creative with individual rolls.
- Second Rise and Oven Prep: Now that your dough has beautifully risen, it’s time to give it a second chance to expand. Grease three baking sheets – these will be the cozy homes for your future loaves! Gently place your shaped dough on the baking sheets, seam side down. Here’s a baker’s trick: cover the dough loosely with plastic wrap or a clean kitchen towel. Let it rise again in a warm place for another 30 minutes. In the meantime, preheat your oven to 480°F (230°C). While the oven heats up, you can also preheat a baking stone [What is a baking stone? A baking stone is a slab of ceramic or cordierite that helps distribute heat evenly in your oven. You can find them at most kitchenware stores. Preheating a baking stone can help you achieve a crispier crust on your rye bread.] in the oven for even better results.
- Baking to Perfection: By now, your kitchen should be filled with the wonderful aroma of freshly rising bread – isn’t that the best smell ever? Check on your dough – it should look puffy and ready for the oven. Brush the top of each loaf with some melted butter (softened butter is your friend here!). This adds a touch of shine and helps create a beautiful golden brown crust. You can also use a sharp knife to slash a long line down the center of the top of the loaf – this helps the bread rise evenly and prevents cracking. Now for the grand finale – baking! Carefully transfer the baking sheets with the dough to the oven. If you preheated a baking stone, place the baking sheets directly on the stone. Set your timer for 40 minutes.
- The Big Reveal: The timer goes off, and it’s time to peek at your masterpiece! Gently tap the bottom of a loaf – it should sound hollow if it’s done. If you’re not quite sure, you can also use a meat thermometer to check the internal temperature. The internal temperature of the bread should reach 190°F (88°C) for a perfectly baked loaf. Carefully take the loaves out of the oven and transfer them to a wire rack to cool completely before slicing. This is important – resist the urge to dig in right away! The bread needs time to cool down so the slices hold their shape perfectly.
- Enjoy Your Rye Bread Creation! There you have it – beautiful, homemade loaves of rye bread! Now comes the best part – enjoying your delicious creation. Here are a few ideas to get you started:
- Classic Enjoyment: Slather the bread with some butter, pile on your favorite toppings (think cheese, avocado, smoked salmon), or savor it on its own.
- Toasty Delight: Toast slices of rye bread for a warm and crispy treat. Perfect for breakfast or a light snack.
- Open-Faced Adventure: Get creative with open-faced sandwiches! Top your toasted rye bread with anything from hummus and roasted vegetables to pesto and mozzarella.
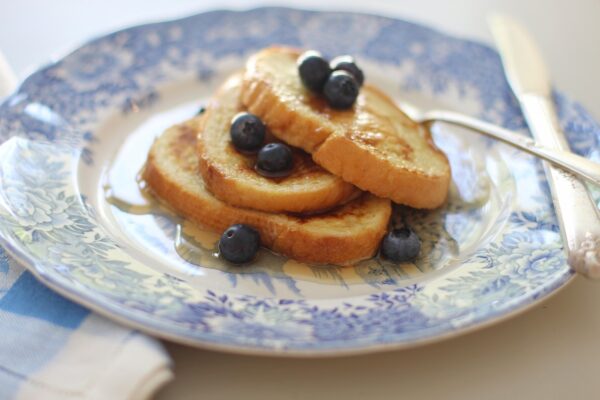
- Rye Bread French Toast: Elevate your weekend brunch with a twist! Use rye bread for decadent French toast, drizzled with maple syrup and fresh berries.
This rye bread recipe is a wonderful way to experience the joy of baking. It’s a versatile bread that can be enjoyed in countless ways, and it’s perfect for beginner and experienced bakers alike. So, what are you waiting for? Grab your ingredients and get baking!
Bonus: Tips and Troubleshooting
- Rye flour can be trickier to work with than all-purpose flour. Don’t be discouraged if the dough feels a bit sticky. Keep kneading until it becomes smooth and elastic, but not dry and stiff.
- If your dough seems too dry after kneading, add a tablespoon of water at a time until it reaches the desired consistency.
- Don’t skip the second rise! This allows the dough to rise further and develop its characteristic flavor and texture.
- For a deeper rye flavor, you can substitute up to half of the all-purpose flour with rye flour.
- Rye bread can be stored at room temperature for up to 2 days, or in the fridge for up to a week. You can also freeze the bread for up to 2 months.