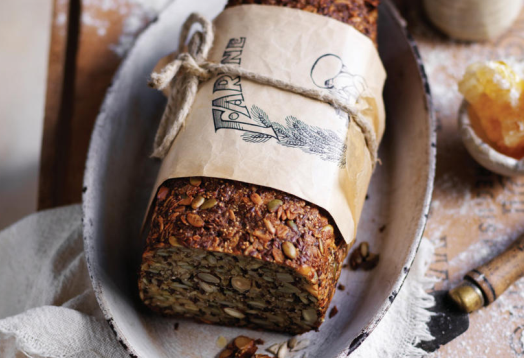
This Seedaholic Bread recipe is a nutritional powerhouse packed with a variety of seeds and nuts. It’s perfect for those seeking a delicious and satisfying way to incorporate more fiber, healthy fats, and essential nutrients into their diet.
Seedaholic Bread: A Step-by-Step Guide

Calling all seed lovers! This Seedaholic Bread recipe is a symphony of textures and tastes, packed with a variety of nutritious seeds and nuts. Here’s how to create this wholesome loaf:
Stage 1: Gathering the Goodness (10 minutes)
- Prep the Pan: Grease a 6-cup loaf pan (around 5 ½ x 9 ½ inches) for easy removal later. Line the base and two long sides with parchment paper, extending the paper a couple of inches over the edge for easy lifting.
- Combine Dry Ingredients: In a large bowl, gather your army of seeds and nuts – rolled oats, quinoa flakes, sunflower seeds, pepitas, flaxseeds, chia seeds, chopped almonds, and chopped hazelnuts. Give them a good stir to combine.
Stage 2: The Binding Magic (5 minutes)
- Whisk Wet Ingredients: In a separate bowl, whisk together the warm water, raw honey, and melted coconut oil until everything is well dissolved and incorporated.
Stage 3: Uniting the Forces (5 minutes)
- Pour & Stir: Pour the wet ingredients over the dry seed and nut mixture in the large bowl. Use a spoon or spatula to mix everything together until well combined. The mixture will be firm, but don’t worry if it seems a little stiff.
Stage 4: Shaping & Soaking (2 hours)
- Transfer & Shape: Spoon the seedy mixture into your prepared loaf pan. Use your hands (wet them slightly if needed) to gently shape the mixture into an even loaf, pressing it down to fill the corners. The mixture might mound a bit above the rim of the pan, but that’s okay.
- Rest & Absorb: Cover the surface of the loaf pan with plastic wrap. Let it stand at room temperature for a full 2 hours. This allows the ingredients to absorb the liquid and the bread to set its shape before baking.
Stage 5: Baking to Perfection (1 hour 40 minutes + cooling)
- Preheat & Adjust: Preheat your oven to 400°F (200°C). Position the oven shelf so the top of the bread will sit in the middle of the oven for even baking.
- Initial Bake: Bake the bread for 30 minutes.
- Flip & Continue: After 30 minutes, carefully remove the pan from the oven and invert the bread onto a wire rack placed on a baking tray. Gently peel away the lining paper.
- Second Bake & Check: Return the pan with the inverted bread back to the oven on the tray. Bake for an additional 1 hour and 20 minutes, or until a skewer inserted into the center comes out clean. If the top starts to brown too quickly during baking, loosely tent it with foil.
- Cool Completely: Once baked, leave the bread on the tray for a full 3 hours, or until completely cool, before slicing and enjoying.
Tips for Seedaholic Success:
- Psyllium husks, readily available at health food stores, act as a binder in this recipe. They’re a great source of fiber too!
- This bread stores well in an airtight container in the refrigerator for up to 2 weeks. Alternatively, slice it and freeze it for up to 1 month for a quick and healthy breakfast option.
With its delightful combination of textures and flavors, this Seedaholic Bread is sure to become a new favorite. So, gather your seeds, preheat your oven, and embark on a baking adventure filled with wholesome goodness!